Flipping Marvellous

Our school’s PTA always puts on a lovely Pancake Day breakfast event and the parents are invited to join. The kids love it and I make sure I bring with GAPS approved pancakes, cut fruit and honey, so they feel fulfilled and happy.

GAPS pancakes with cultured cream, coconut chips and frozen blueberries

Here are some pancake recipe ideas:

Basic Pancaks:
These will be quite flat, like the traditional ones.
A note about nuts: If you are taking them to school, use the nut-free option.
Ingredients:
6 eggs
1 Ripe Banana*
1 heaped tablespoon Cashew Butter**
1/4 tsp baking soda
optional: 1 tbsp melted ghee
Fat like ghee, butter or coconut oil for frying
* If you don’t have a ripe banana, replace it with 2-3tbsp 24hr yogurt or cream
** For an allergy safe, nut free version, use a flat tbsp of coconut flour

Method:
1. Place all the pancake ingredients in a blender and process to a loose batter.
2. Heat some of your chosen fat in a frying pan and pour some batter into the hot pan. Wait until the top of the pancake is covered in bubbles and the batter has set, then flip over and fry for another minute. Remove from the pan and repeat with the rest of the batter.
3. Serve with lemon and honey.

American Style pancakes
These are smaller and fluffier pancakes.
Ingredients:
6 Eggs
1 tbsp honey
1/4tsp vanilla powder
2tbsp 24hr yogurt, cream or coconut milk
1.5-2 cups ground almonds
1/2tsp baking soda
Ghee, Butter or coconut oil for frying

Method:
1. Place all the pancake ingredients in a blender and process to a thick batter.
2. Heat some of your fat of choice in a frying pan and pour blobs of batter into the hot pan. Wait until the top of the pancakes are covered in bubbles and the batter has set, then flip over and fry for another minute. Remove from the pan and repeat with the rest of the batter.
3. Serve with your favourite toppings, such as: GAPS cream, Ghee/Butter, blueberries, honey, toasted coconut flakes…

Happy pancake day!


Nutrient Dense seasoning No2.

So after trying liver and kidney, I had a pack of chicken hearts in my freezer and decided to make some seasoning out of it. I also had lots of dehydrated cherry tomatoes leftover from summer and decided they will go well together. That set my next organ seasoning mix in the Mediterranean or Italian direction.

As mentioned in my previous post , the fat and sinew on the meat ads a wonderful umami flavour to the mix, so I kept it on the hearts for the dehydration process.

Nutrient Dense Italian Spice mix

Ingredients:
120g dehydrated organ meat (I used chicken hearts)
60g well dehydrated/sundried tomatoes
30g salt (Maldon or Atlantic)
20g mixed herbs such as oregano, thyme, marjoram and rosemary
10g Garlic Powder

Method:
1. Dehydrate your organ meat until it is dry enough to snap in to small pieces. I find that slicing the organ meat thinly makes everything easier.
2. Once the meat is ready, break it into small shards and place it with all the herbs and spices into a strong blender bowl that is made for grinding dry ingredients (I use a Vitamix). Add the rest of the spices and herbs.
3. Gradually and carefully blend the ingredients, while stopping every 20-30 seconds and using a thin utensil (like a chopstick) to mix the powder around and ensure an even blend. Make sure to not overheat the powder in the process.
4. Once the mix has blended into an even, cores powder, leave it to cool completely from the heat created during the grinding process and then store it in a spice shaker and the rest in an airtight container.

Uses for this spice mix:
I used it to season burgers and as a seasoning when serving food, instead of using salt and pepper.

Chocolate Cake for Chocolate Lovers

Did you know that today was chocolate cake day?

My kid is obsessed with chocolate and though it’s not a GAPS food, I started adding it in small quantities after the first year on the protocol. Before I added cocoa in, I used cocoa butter, which gives a lovely chocolaty flavour.

So, for chocolate cake day I’m sharing with you my recipe for a moist, rich and extremely chocolaty cake.

Chocolate Cake

Grain Free, Sugar Free, Starch Free and very chocolaty

Ingredients:
300g apple sauce or yogurt or a mixture of both and other leftover fruit
5 eggs
150g butter or ghee
100g coconut oil
14 Madgul dates
3 heaped tbsp cocoa powder
200g ground almonds
2tbsp coconut flour
1tsp baking soda
1/2 tsp vanilla powder
Pinch of salt

For the frosting:
1 can coconut cream (Biona)
100g almond butter
4 tbsp honey
4 tbsp best quality cocoa powder

Method:
1. Preheat the oven to 170c and prepare 2 loaf tins or 1 loaf pan and 1 cupcake tin. Make sure the baking pans are lined with parchment (or cupcake cases). Boil some water in the kettle.
2. Take the stones out of the dates and leave them to soak in the boiled water. Measure the butter and coconut oil into an= heatproof bowl and place it in the heating oven to melt.
3. Place the fruit/yogurt in your food processor bowl and add the eggs and cocoa powder and process to a smooth batter. Add the soaked dates and process them through, then add the melted fats and process.
4. Add the rest of the ingredients and process to a consistent, smooth batter.
5. Pour the batter into the prepared baking trays and place in the oven. The loaf will need 35-40min baking and the cupcakes will need 25-30min.
6. remove from the oven and cool completely before spreading the icing

Make the Frosting:
1. Open the can of coconut cream and scoop out only the set part into a mixing bowl. Keep the ‘watery’ bit for other uses. Soften the cream a little with an electronic mixer.
2. Add the almond butter and beat some more, then add the honey and cocoa powder and beat until the frosting is creamy, smooth and fluffy.
3. Spread on the cold cake and serve.

Keep refrigerated for up to 1 week.

Nutrient Dense seasoning No1.

So here is what I know:
> Organ Meat is full of readily available nutrients.
> It’s hard to get my kids to eat organ meat

One way I sneak liver into my kids meals is grinding it with beef to make burgers, meatballs and sausages. Then, I came across a company in the US called ‘Pluck‘. They make and sell dehydrated organ meat seasoning. At the same time, it seems like a new trend of spice mixes is emerging into the world of Instagram, with some new and interesting flavour combinations.
Well…
I have a food dehydrator.
I have lots of herbs and spices I want to use.
Why not have a go?!

Things I’ve learnt along the way:
1. Kidney has a very strong and prominent offal flavour and small. Use it sparingly.
2. Make sure your meat is completely dehydrated before grinding.
3. Fat left on the organs gives a fantastic umami flavour
4. The grinding process takes time. Be patient, stop, mix and start again, until you get and even grind.

I’ve made two spice mixes so far. Here is recipe No.1:

Peppery and Nutrient Dense Spice mix

Ingredients:
150g dehydrated, preferably grass fed, organ meat (I used a mix of liver and kidney)
50g Maldon salt
20g Himalayan salt
10g black pepper
7g coriander seed
10g oregano
3tsp mustard powder

Method:
1. Dehydrate your organ meat until it is dry enough to snap in to small pieces. I find that slicing the organ meat thinly makes everything easier.
2. Once the meat is ready, break it into small shards and place it with all the herbs and spices into a strong blender bowl that is made for grinding dry ingredients (I use a Vitamix). Add the rest of the herbs and spices.
3. Gradually and carefully blend the ingredients, while stopping every 20-30 seconds and using a thin utensil (like a chopstick) to mix the powder around and ensure an even blend. Make sure to not overheat the powder in the process.
4. Once the mix has blended into an even, cores powder, leave it to cool completely from the heat created during the grinding process and then store it in a spice shaker and the rest in an airtight container.

Fat Bomb Broccoli Muffins

OK, I know it’s been a while and I’m trying to bring some more forward planning and structure into my life. This includes updating this blog more often. So, here’s a great recipe that I created this week. It’s a wonderful combination of two concepts which results in a muffin that’s a bit of a meal on it’s own.

The first recipe came from Jo Witton of Quirky Cooking. She has just launched a new cookbook, but this recipe came from her first book, Life Changing Food (which I have as an app and it’s a super clever idea). Her recipe for Fat Bomb Muffins results in a very sturdy and flexible bake, but I found the flavour a bit challenging. Then, I remembered a Broccoli Cake I once made from a photocopy of a cookbook and after some online searching I found the source in the Rose Bakery ‘Breakfast Lunch Dinner‘ book. I remember loving the deep butter and fenugreek flavours and though they would work well with the fat muffins.

Well… I’m not always right… but this time I was.
These muffins are so moreish and delicious. I made them for a Baking Club meetup and they went really well with the soups the host made.

Broccoli Fat Bomb Muffins

Based on Jo Witton’s recipe: Rachels Fat Bomb Muffin

Makes 24 standard muffins

Ingredients:
200g coconut oil
225g ghee or butter (or goose fat)
280g ground almonds or a combination of ground almonds and fermented cashew butter
10 eggs
2tbsp Maldon salt
2 heaped tsp curry powder (I used Madras)
2 tsp turmeric
1-2 broccoli heads

Method:

  1. Cut all the florets off the broccoli and steam them in salted water, for a few minutes. They should still have a bit of crunch. Wash with cold water and leave to drain the a colander. Keep the broccoli stem for a different use.
  2. Preheat the oven to 170c and prepare two 12-hole muffin trays with muffin cases.
  3. measure out the coconut oil and ghee into a heatproof bowl and melt them together in the heating oven.
  4. Place the eggs, almond flour, salt and spices in a food processor bowl (or in a large mixing bowl if using a hand held blender) and process until combined. Add the melted fats and bled to a thick, creamy batter.
  5. Scoop the batter into the muffin cases, to 3/4 height and sink a broccoli floret into each muffin and use a spoon or your fingers to cover the top of the floret with some batter, then sprinkle the top with some more curry powder and salt (or any other lightweight topping you like).
  6. Bake in the hot oven for 35-40min, until the outer colour is consistent around the muffins.
  7. Cool and serve. Keep the muffins refrigerated for up to a week.

A Simple Spring ‘Pasta’

Sometimes you find yourself home alone for dinner and all you want is a comforting, creamy bowl of pasta. On a grain-free diet it’s not that straight forward, but inspiration hit me the other day and I think I managed to create a dish that really hits the spot.

2014-05-07 19.22.57

Jamie Oliver, in his 30 Minute Meals book and programme really inspired me to create freshly made quick meals and some of the methods he uses really come through in this recipes, just because I think they are so cleaver and useful.

You can make this recipe with almost any veg you have lying around in your fridge and create flavour combinations that suit your pallet. Add chilli flakes for a kick of heat or butter for a richer flavour.

2014-05-07 19.19.21  2014-05-07 19.18.43  2014-05-07 19.22.47

A Simple Spring ‘Pasta’

Serves 1

Ingredients:
3-4 Garlic cloves, thinly sliced (I like using lots of garlic)
Half a punet Mushrooms (chestnut, oyster or button), cleaned and sliced
1 small bunch Asparagus, chopped as you like it
1 large courgette, outer flesh shaved into strips using a peeler (making your ‘pasta’) and the core cut into cubes
3 heaped Tbsp SCD yogurt (or any other yogurt you like, I used sheep’s milk yogurt)
2 Tbsp good quality olive oil
a few sprigs of fresh herbs such as rosemary, basil, chives, oregano or thyme, roughly chopped
40gr Parmesan
a handful or pine nuts
Nutmeg to taste
Salt and pepper

Method:

  1. Heat one tbsp of the olive oil in a frying pan on a medium to high heat and add a quantity of two garlic cloves to the pan.
  2. When the garlic has infused the oil but before it burns add the mushrooms and toss in the oil.
  3. When the mushrooms have stated colouring, add the asparagus and courgette core.
  4. Whilst the vegetables are frying, and keeping an eye that they don’t burn, prepare the yogurt sauce: Place the yogurt in the bowl you are planning to eat from, dress with the rest of the olive oil, grate in most of the the parmesan and the nutmeg. Season with salt and pepper to taste. Give it a good mix and taste. Amend seasoning and set aside.
  5. Give the vegetables a mix and add in the courgette ‘pasta’ strips, the rest of the garlic and the herbs. Toss gently, making sure not to tear the strips. Cook for a few minutes until the courgette goes a bit translucent but not over cooked.
  6. Pour the veg into the bowl with the yogurt sauce and mix quickly. Leave the hob on.
  7. Return the pan to the hob and put the pine nuts on to roast. In the mean while grate the rest of the parmesan on your dish. When the nuts started taking colour sprinkle them over the ‘pasta’ and drizzle with a bit more olive oil.

Enjoy!

Lovingly grain free

Making love happen is so much better when you aren’t bloated, uncomfortable and in pain. here are some ideas for a grain free Valentines Day meal that will leave you with enough energy and spunk for the real deal:

First Course: Herby cracker wedges with a Labaneh dip

For the herby Crackers:
Original recipe from Elena’s Pantry

2 cups Ground Almonds
1 tsp Salt
2 Dired Figs, chopped into small cubes (if figs don’t agree with you, used dates)
1 Rosemary Sprigs, roughly chopped
1 Egg
2 tbsp Olive Oil
2 tbsp water (optional)

Method:

  1. Heat the oven to 160˚c
  2. In a bowl mix together the ground almonds, salt, figs and rosemary.
  3. In a separate small bowl whisk together the egg and olive oil.
  4. Add the wet ingredients to the bowl of dry ingredients and combine with a spoon to a greedy dough. If the dough is too dry and won’t come together, add some water, a little at a time.
  5. Roll the dough out between two sheets of  parchment paper and slice the raw dough into wedges (like slicing a pizza)
  6. Bake for 10min or until the crackers are golden brown, remove from the oven and let cool for 5 min before serving with SCD Labaneh.

* If you are vegan these wedges work great without the egg.

Fig and Rosemary crackers in the making

For the Labaneh (a Lebanese style cream cheese spread):

The night before your dinner, line a sieve with a muslin cloth and place over a bowl. Pour into the lined sieve 3 cups of SCD yogurt (if you can tolerate it, shop bought sheep or goat’s yogurt are also good). Gather the edges of the muslin over the yogurt so nothing falls in and leave in the fridge or a very cool place over night. When you are ready to serve scrape the creamy cheese from the muslin into the serving dish and decorate with olive oil and Zaatar if you have. If not, use thyme or smoky paprika.

Meatballs and Cavolo Nero 'Pasta'

Main Course: Meatballs in tomato sauce and cavolo nero ‘pasta’

Inspired by Disney’s Lady and the Tramp

Cavolo Nero is ‘black cabbage’ and is both yummy and healthy. It’s available this time of year and it’s shape lends itself to be a great replacement to pasta, but don’t be discouraged if you can’t find it in the shops, use kale instead.

For the meatballs:

1 Onion, finely chopped
2 tbp fresh or dry herbs (whatever you have at home… rosemary, thyme, oregano, basil…)
500gr Minced Beef
1 egg
Salt and Pepper to taste
Oil for frying

For the tomato sauce:

1 large onion, roughly chopped
2 cloves Garlic
2 Carrots, grated
2 cans Chopped Tomatoes or 1 bottle of legal Passata
1/2 cup Dry Red Wine (add more to taste or if sauce is too dry)
2 tbsp herbs of your choice (I used rosemary)
Salt and Pepper to taste
Olive Oil

Method:

  1. Make the meatballs: Combine all the meatball ingredients in a bowl and leave to rest at room temperature whilst you make the sauce.
  2. In a deep pan heat a glugg of oil and an equal amount of water, add the chopped onion and fry on a medium heat until translucent and golden brown. If the onions start to burn add a little more water. Browning them slowly will develop a sweet taste but burning them will give a bitter flavour. Add the garlic and grated carrots and continue frying for 3-5min.
  3. Add the tomatoes, red wine and herbs and season to taste.
  4. Cook, uncovered, on a medium heat whilst you are frying the meatballs.
  5. Heat a glugg of olive oil in a pan.
  6. Roll meat balls to the size of a ping-pong ball and brown in the heated oil, about 2-3 min on each side. Make sure the meatballs are not crammed in the pan, as this will make them boil rather than fry. This might take a few batches, so transfer the cooked balls into the bubbling sauce.
  7. Once all the balls are fried and cooking in the tomato sauce, make you ‘pasta’

For the Cavolo Nero ‘Pasta’:

1/2 ‘head’ of Cavolo Nero cabbage or half bag of ready to use chopped Kale
1 sprig Rosemary
2 garlic cloves (if you are both eating garlic than it won’t matter when you kiss)
1tsp Olive Oil
1 tsp Ghee
Salt and Pepper to taste
Grated Parmesan to taste

Method:

  1. Fill a large saucepan with salted water and bring to the boil.
  2. Wash the cavolo nero thoroughly and shake to dry, then place each leaf up-side-down on a cutting bore and using a sharp knife, cut the dark leaf away from the light green stem. The stem is quite woody even when cooked so I usually discard it. The leaves are now long strips and resemble pasta noodles.
  3. When the water is boiling, drop the leaves in and simmer for 3-4 minutes.
  4. Whilst the leaves are cooking, finely slice the garlic cloves and rosemary.
  5. When the Cavolo Nero is cooked, drain into a colander. Leave the leaves in the colander and return the saucepan to the heat, melt the ghee and oil together, add the garlic and rosemary and stir gently for about 1 minute before adding the cavolo nero leaves. Warm through and make sure the leaves are covered. Season to taste.

Assemble:

  1. The cavolo nero is your pasta, so pile it in the middle of a pasta dish and top with the meatballs and tomato sauce (I usually serve 4 balls for each diner).
  2. Grate or shave parmesan over everything and enjoy.

* If you are gentle, you might even be able to re-inact the movie scene.

Layered Dessert

Dessert: Fruit, Crumble and Cream Layered Heaven

Make the crumble and whipped coconut crease in advance the assemble just before serving.

First thing’s first: The night before your dinner, put 1 can Coconut Milk (Make sure you get pure coconut milk with no stabilisers and additives) in the fridge. Don’t shake it. The milk will separate to water and cream and you want the cream for whipping later.

1 cup blanched almonds
1/2 cup cashew nuts
1/2 cup pecan nuts
(use any nut combination you like and have in the house: Walnuts, Macadamia or Brazil nuts work really well too)
2 tbsp coconut flakes, optional (shredded coconut is also fine just make sure you use an unsweetened product)
2 tbsp Ghee
2 tbsp honey
Pinch of salt (use pink Himalayan if you have)
1 Mango / 1 punnet Strawberries / 1 punnet blueberries / pitted cherries or any other fruit you like and works with a soft and crunchy combination.

Method:

  1. Heat the oven to 170˚c and line a baking tray with parchment paper.
  2. Scatter all the nuts and coconut flakes, if using, on the tray, drop little clumps of ghee in and around the nuts and drizzle the honey over everything, then sprinkle the salt.
  3. Roast in the hot oven for 10-15min, checking and shaking the pan every 5min. You what the nuts to turn golden and the honey to caramelise, but nothing should burn, so keep an eye on it.
  4. Once golden and beautiful, remove from the oven and cool completely. The nuts may seam soggy at the start but as they cool they will crunch up.
  5. Put the cold nuts in a food processor and pulse to brake them up. DON’T MAKE A POWDER! Set aside until you are ready to serve.
  6. Prepare the fruit you are using (peel and slice the mango or hull and quarter the strawberries) and set aside until you are ready to serve.
  7. Open the cooled coconut milk can and scoop the hardened cream into a mixing bowl. Save the ‘water’ for cooking but make sure none of it gets into the bowl.
  8. Using an electric mixer whisk the coconut until it resembles fluffy whipped cream. Sweeten with a little honey if required. Store the cream in the fridge until you are ready to use.

Assemble:

In wine glasses or martini cocktail glasses, layer the fruit and then the nut crumble, a bit at a time. When the glass is full, dollop the coconut whipped cream and top with a mint leaf or lemon verbena garnish.

Enjoy and may you have a happy and loving Valentines day. x

Wintery Thoughts

The weather seamed to have gone crazy and reports on TV look a bit like the film ‘The Day After Tomorrow’. Here in the UK we have been waking up at night to the sound or rain trickling on the roof and the whistles of wind blowing in our window. No snow yet.

More dedicated bloggers than me dedicated their end of year posts to summarising and listing 10 of the best… But I’m afraid I just cook and post. I enjoy other’s dedication to photography, styling and creative writing.

Out New Year resolution is to stick to the SCD diet strictly, and hope that this will increase energy levels and decrease the chances of that horrid illness returning to haunt our lives. Lots of will power and creativity required.

There are so many recipes and information out there (like roost, SCD recipe and Hold The bread, Please) but sometimes I like to look at my baking drawer and see what I can come up with. This time cocoa butter, vanilla and cherries (unseasonal but reduced price in the supermarket) popped at me.

2014-01-09 17.59.46

White Forest Muffins

Basic muffin recipe inspired by roost
Makes 12 muffins

Ingredients:
4 cups Ground Almonds
1/2tsp Salt
3/4tsp Baking Soda
2tbsp Coconut oil
1/4 cup Cocoa Butter
1/2 cup  + 1 tbsp Honey
3 Eggs
250gr fresh cherries, pitted and halved
1/2 Vanilla pod (optional)

Method:

  1. Het the oven to 160˚c and line a muffin tin with 12 muffin or cupcake liners (I used a silicone muffin tray so didn’t use paper liners).
  2. In a small bowl, mix the pitted cherries with 1tbsp honey and some of the vanilla beans (if using), then scatter a few cherry halves on the bottom of each lined muffin cup.
  3. Melt the coconut oil and cocoa butter in a small pot on a low heat, then remove form the heat and add the 1/2 cup honey.
  4. Combine the dry ingredients in one bowl.
  5. Whisk the eggs and mix them into the other wet ingredients. Add the rest of the vanilla if using.
  6. Mix wet ingredients into dry until incorporated and pour the batter into each cup, covering the cherries.
  7. Bake for 20-25min until golden brown
  8. Cool completely and serve.

Enjoy

Picnic under the oak tree

It’s been a year since my now husband J popped the question. A whole year has passed, since one of the happiest days of my life and a start of this great journey we are taking together.

A few good months into our engagement, in the midst of our wedding perp, on a sunny day in March, our photographer Blake Ezra came over to our house (which was also the wedding venue) to take some pre-shoot photos of us and the of the venue. I’d highly recommend doing this, as it get’s you used to having someone with a camera following you around and also gets you great professional photos that aren’t in a white dress and all dressed up.

We took Blake for a lovely walk in the woods, past the spot where we got engaged, and had some fun re-enacting the moment.

Shira and Jon Engagement shoot Shira and Jon Engagement shoot Shira and Jon Engagement shoot Shira and Jon Engagement shoot

So a year later, we thought it would be fun to go back to that beautiful spot where we got engaged  and have a nice afternoon picnic (all SCD friendly of course).

2013-08-10 16.18.48 2013-08-10 16.33.34

2013-08-10 14.12.30

An SCD friendly Picnic

The picnic included: Roasted veg with Tahini, Beetroot Carpaccio with Manchego, a green salad, SCD bread (coming soon, an improved recipe) and carrot and courgette cupcakes for dessert.

Quantities for the recipes depend on how many people you are serving. Also, use any veg you like and are available to you.

Roasted Vegetables with Tahini (served cold):

Ingredients:
Courgettes
Cauliflower
Sweet Peppers (I used mini sweet peppers but use any red/yellow/orange you can find)
Garlic, chopped
Olive Oil
Oregano or Thyme
Salt and Pepper to taste

Method:

  1. Line a baking sheet (or two) with aluminium foil and heat your oven to 190˚c.
  2. Slice the vegetables into a large mixing bowl (you can mix them together, but if you are using beetroot, make sure you dress it separately so you don’t stain all your veg)
  3. Add the garlic, a good glugg of olive oil, herbs and seasoning and toss the veg until they are well coated in the oil and herbs.
  4. Arrange the veg on the baking sheet (I like to arrange them neatly but you also tip the contents of your bowl and scatter the veg).
  5. Roast in the oven for aprox 40min, or until nicely golden on top with slightly charred edges, then remove from the oven, let cool and enjoy with a dollop of tahini dressing (equal parts of Tahini paste and water, garlic and salt to taste, chopped parsley and lemon juice. Mix together to a runny consistency, adding more water and seasoning if needed).

Beetroot Carpaccio with Manchego 

Serves 2-4

Ingredients:
2 Fresh Beets, washed and peeled (I only had red beets, but by all means, use a variety of colours if you can)
2tbs Olive Oil
Juice of half a lemon
1 sprig Mint
Salt and pepper to taste
Manchego, Parmesan or even Blue cheese

Method:

  1. If you have a mandolin, use it to slice the beets on thickness 1. If no, slice the beets very thinly with a very sharp knife.
  2. Place the sliced beets in a bowl (or even in the box you will be taking them to the picnic in), add the rest of the ingredients and mix very well, making sure all the beet ‘pages’ are smothered in the dressing.
  3. Leave in the fridge until ready to use.
  4. Wash the mandolin from the beetroot juices and slice the Manchego on the same setting. Keep the cheese separate from the beets and at the picnic. combine them on the plate or on a sandwich.

Note: On another occasion I served the beetroot carpaccio as an accompaniment to lemon and dill Salmon Gravad Lax with a herby pesto dressing and no mint. Yum!

Enjoy!

Don’t waste your food, make quiche!

Last week I was introduced to a great organisation called Feeding the 5000. It’s a UK based organisation, working worldwide to fight food waste. J and I spent the afternoon in central London, helping them distribute perfectly good peppers and cherry tomatoes that were rejected by the supermarkets for not being ‘perfect’ enough to go on their shelves.

DSC_1908

The cleaver thing is that the Feeding the 5K guys didn’t just give away the vegetables. To anyone who would stop and listen to our shpiel, we gave out a bag with lots of veg which included a recipe for Gezpacho soup by celebrity chef Hugh Fearnley-Whittingstall. We asked them to maybe make the gezpacho and invite friends over to enjoy their soup, and in the ‘pop-up’ restaurant spirit maybe ask them for a donation to the organisation and sign up to the no-food-waste pledge.

This activity really brought to light the detachment we have from the food production process and the lack of awareness to the amount of food that is wasted every day.

At the end of the afternoon, we were still left with a good amount of peppers and as the City people went back to their offices we loaded our bags with peppers and headed back home to grill, cook and preserve about 30kg of red, yellow and green peppers.

DSC_1913

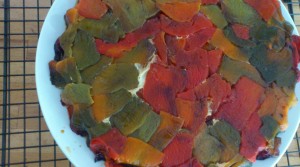
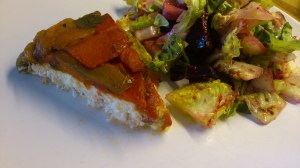
Upside Down Pepper Quiche

Inspired by this recipe by Dvarim Bealma
There are a few steps to this quiche, but it can be made all in one go.

Ingredients:
4-6 Peppers (asorted colours)
1 whole garlic bulb
4 Eggs
500ml Goats Milk Yogurt (SCD yogurt if possible)
30gr Parmesan Cheese, grated
12 Pitted Kalamata Olives, roughly chopped
6 Dried tomatoes, sliced
1tbsp fresh mint
1tbsp Fresh Thyme
Salt & Pepper to taste

Note about the herbs: Use any herb combination you like/have. If you don’t have fresh herbs, use dry.

Method:

First roast the peppers and garlic: 

  1. Heat the oven to 250˚c and line a baking tray with aluminium foil.
  2. Take another (smal-ish) piece of aluminium foil, place it flat on your work board and dress with a little olive oil, salt and a sprig of thyme, then cut off the bottom of the garlic bulb and place it, cut side down, on the dressed foil. Wrap up the garlic and place it on the baking trey.
  3. Place all of your peppers, whole and washed, on the baking tray and place in the hot oven.
  4. Important: the peppers need to be turned every aprox 10min so they are evenly roasted on all sides.
  5. After the peppers are roasted remove from the oven and lower the temperature to 170˚c. Set the roasted garlic aside to cool.
  6. Place all the peppers in a large glass bowl and cover the top with cling film. Leave the peppers to steam and cool. This process with make separating the peel from the flesh a very easy job.

Whilst the peppers are steaming and cooling, make the quiche filing by combining all the ingredients and whisking them in a bowl. Don’t forget to unwrap the garlic and squeeze the roasted cloves into the batter.

Assembling the quiche:

  1. Peel the roasted peppers, one by one, by pulling the loose burnt bits away from the soft flesh, then gently remove the flesh from the stem, trying to pull from the bottom, so the seeds stay on the stem.
  2. Gently slice the flesh on one side so the pepper can be spread out flat, then clean any seeds from the surface.
  3. When all your peppers are peeled and clean, start lining your pie dish with the peppers, making sure they overlap so the filling doesn’t seep through, just like a normal pie crust.
  4. Pour in the filling batter and bake in the oven for 35min, or until the filling is slightly wobbly but not runny.
  5. Remove from the oven and let cool for at least 15min, then place a plate , up-side-down on top of the pie and flip it over (do this over the sink as there will be some liquid spilling out).
  6. Release the quiche from the pie dish and serve with salad.

Enjoy!